WeVideo Power Tips: Adding Comments as Markers and for Snapping
Placing a comment marker and adding comments.
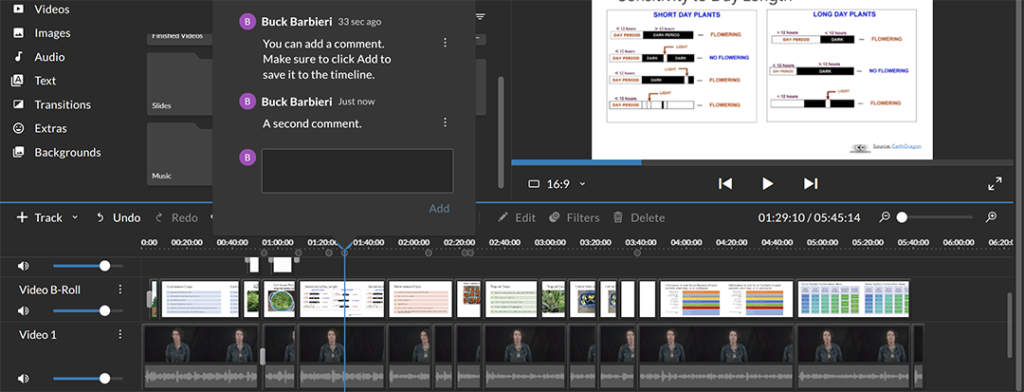
Typing “C” will place a comment or marker on the timeline. You can also click on the “Add a comment” icon in the toolbar over the timeline. It looks like three horizontal dots inside a speech bubble. These comment markers can be used to snap the play head to specific points on clips or the timeline. This can come in handy when wanting a bit more precision or needing to snap-to a precise location while editing. The comment marker looks like an open circle and sits on top of the timeline. You can make as many or as few of these comment markers as you like. Further, you can add notes to each and even change their position if needed.

You can leave any sort of comment to help you during editing. It can also come in handy for labeling comments since WeVideo as yet has no color options for markers to help distinguish their function.

Adding multiple comments to a single comment marker
After you add a comment, it will appear with your name over it. You can click add again to open another dialog box to add another comment. Click the add button to save the new comment. If you are working collaboratively, This feature can come in handy allowing multiple users to add their comments as well. While this will not affect the snapping function, it is good to know.

Linking the comment or marker to a specific clip
Markers or comments will by default stay on one spot on the timeline regardless of where a clip is. Meaning, by default these are markers on your timeline only. If you want a maker to be “locked” to a clip so when you move the clip the comment or marker travels with it, you need to tell Wevideo to link said comment to a clip.
So, to create this link, after you have placed a comment or marker where you want it, click on the open circle then on the three-dots menu in the small window that appears (The top-most three dots, next to the time index). Then, hover your mouse over to “Link thread to clip” and select the name of the video track that holds the clip that you want to mark or make a comment on. Video track names are on the far left of the timeline. When they are linked, wherever that clip goes, the marker will travel along with it.

Linking the comment or marker to a specific clip, when you have more than one video track
There are times when you may have more than one video layer. For instance, say you have main footage and some supporting footage. We call main footage A-roll and any supporting, secondary footage B-roll. In fact it’s best and standard practice to place your main footage on the bottom most video track and your B-roll directly above it in its own separate video track. You can also place any images, graphics and text on a separate track, too. In addition to visual media, you may have audio tracks for music, voice-overs or sound effects for example. Every project is different and how many tracks you may need will depend on the needs of your project.
If you link a marker to a clip and decide later that you need to move a clip to another video layer, the marker remains linked to your clip. Meaning, you can move clips and other media with linked markers and will not have to re-link the comment or marker which is nice.

What if you accidentally link a maker to the wrong clip?
If you accidentally link a comment, or marker to the wrong video track and need to change it, first simply repeat the steps for linking but this time select “No selection” to un-link it, and then relink it to the correct layer.
Linking the comment or marker to the timeline itself and not any specific clip.
Other times you’ll want a marker to remain fixed at a certain point in time on the timeline and not a spot on a clip. You’d do this if you wanted to leave a marker or comment with emphasis on a specific time. For example, if you want to make a video that is no longer than one minute, fixing a marker at one minute will help you keep an eye on that goal while editing.
What do you do to make such a marker? Nothing other than typing C and making a note on the maker if you want. It’s Wevideo’s default mode to create comments / markers on the timeline as unlinked to any one clip. So, no matter how clips move around in the edit, these time-specific markers will remain where they are unless you move them directly.
Moving a comment or marker after you’ve created it.
You may need to adjust a marker or comment position while editing, whether It’s linked to a clip or meant to remain on the timeline itself as a timing marker. To move a marker, just click on the open circle and slide it to another spot. A linked comment / marker will remain linked to a new point on the clip onced you adjusted its position. So wherever that clip goes, the marker will still travel along with it at that new position. And likewise, a moved timeline marker will remain in its new spot on the timeline.


